

Yummiest, Creamiest, Easy Peanut Sesame Noodles with Salmon
I grew up eating sesame peanut noodles and together with my mom, we have perfected the yummiest, creamiest, most satisfying peanut sesame noodles. Some of our secrets? Adding milk and using crunchy peanut butter!
I grew up eating sesame peanut noodles and together with my mom, we have perfected the yummiest, creamiest, most satisfying peanut sesame noodles. Some of our secrets? Adding milk and using crunchy peanut butter!

PREP: 10 ish minutes
COOK: 35 ish minutes
TOTAL: 45 ish minutes
SERVINGS: 4 servings
INGREGIENTS:
1 lb spaghetti (or your favorite noodle: pad thai, soba, etc.)
4 tbsp soy sauce
6 tbsp crunchy peanut butter
2 tsp fresh grated ginger
2 tbsp rice wine vinegar
4 tbsp milk
4 tsp minced garlic
4 tbsp sesame oil
1.5 - 2 lbs salmon
Salt, pepper, and garlic powder for seasoning the salmon
Green onion for garnish
Crushed red chili peppers or crunchy chili oil for some spicy garnish.
INSTRUCTIONS:
Preheat oven to 300º. Pat dry the salmon. Spray with avocado or olive oil, both sides, and season with salt, pepper, and garlic powder. Put salmon in oven, skin side down, for about 25 minutes. We are cooking her low and slow!
When salmon is done cooking (about 125º internal temperature), turn salmon over for skin side up, and broil until crispy.
Bring noodles to a boil in a large pot of water according to packaged directions.
Whisk together the soy sauce, peanut butter, ginger, rice wine vinegar, garlic, milk, and sesame oil in a sauce pan and bring to a simmer. If you need to add additional milk to make into a creamy sauce, add. Remove from heat.
Drain noodles. Pour MOST of the sauce over the noodles and toss until noodles are fully covered. RESERVE some sauce for the salmon.
Plate your noodles. Add salmon. Top with additional peanut sesame sauce. Garnish with green onion.
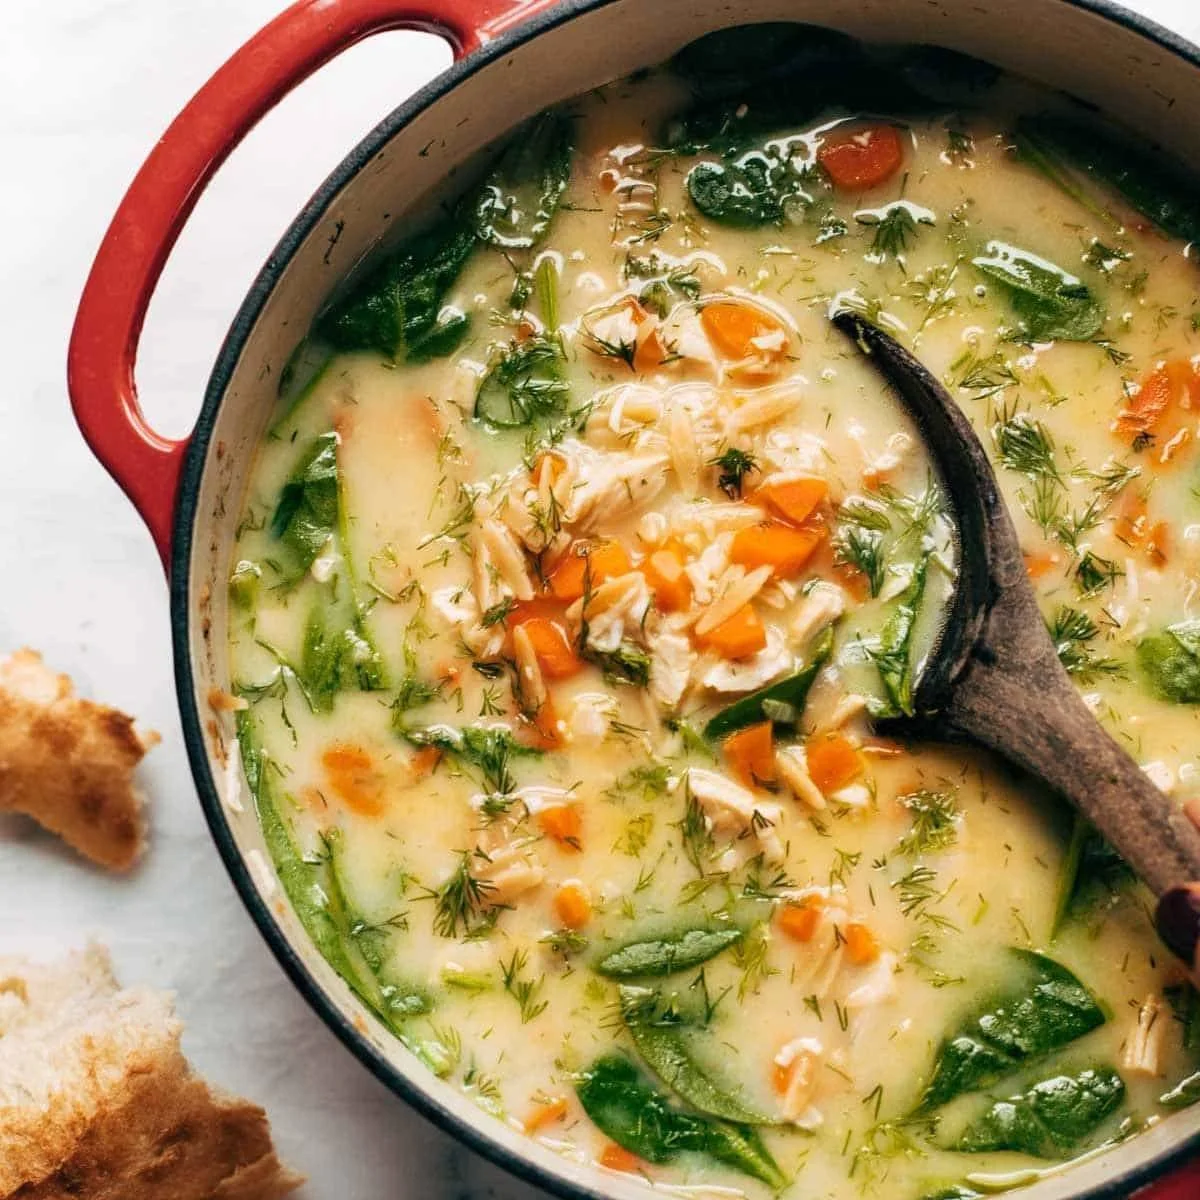
Lemon Chicken Orzo Soup
This has become my new go-to whenever someone isn’t feeling well. Think the Greek version of the traditional Jewish matzo ball soup. This is our new penicillin. And it’s so flavorful, easy and quick to make, and healthy to boot!
This has become my new go-to whenever someone isn’t feeling well. Think the Greek version of the traditional Jewish matzo ball soup. This is our new penicillin. And it’s so flavorful, easy and quick to make, and healthy to boot!

PREP: 10 ish minutes
COOK: 45 ish minutes
TOTAL: 55 ish minutes
SERVINGS: 4 to 6 servings
INGREGIENTS:
3 medium to large carrots, chopped
1 medium onion, chopped
1 tbsp butter (I prefer salted for this recipe)
1 tbsp oil
6 garlic cloves, minced
2 bay leaves
6 cups chicken bone broth (you can use stock, too, but I prefer the extra protein boost)
1/4 tsp Italian seasoning
1.5 to 2 lbs boneless, skinless chicken breast
1 cup orzo
Juice of 2 lemons
2 egg yolks
Spinach, optional
Salt and pepper to taste
Dill or parsley to taste and garnish, optional
INSTRUCTIONS:
Sauté carrots and onions with the butter and oil in a large stock / soup pot for about 7 to 10 minutes, or until soft and translucent.
Stir in garlic and cook for another minute. Then add bay leaves, broth, chicken, and Italian seasoning and bring to a boil. Once boiling, cover and reduce flame to summer for 15 minutes.
Take out bay leaves and chicken. Add orzo to pot and continue to cook for 10 minutes, stirring occasionally.
Shred chicken and add back to pot.
While orzo is cooking, whisk egg yolks and lemon juice in a small bowl. Take 1 to 2 ladles of soup and pour over egg-lemon mixture to temper it. Add into soup pot and continue to cook for 5 minutes.
Add spinach, optional.
Stir in dill or parsley if desired. Adjust salt and pepper and serve hot.
Optional. Garnish with additional dill / parsley.
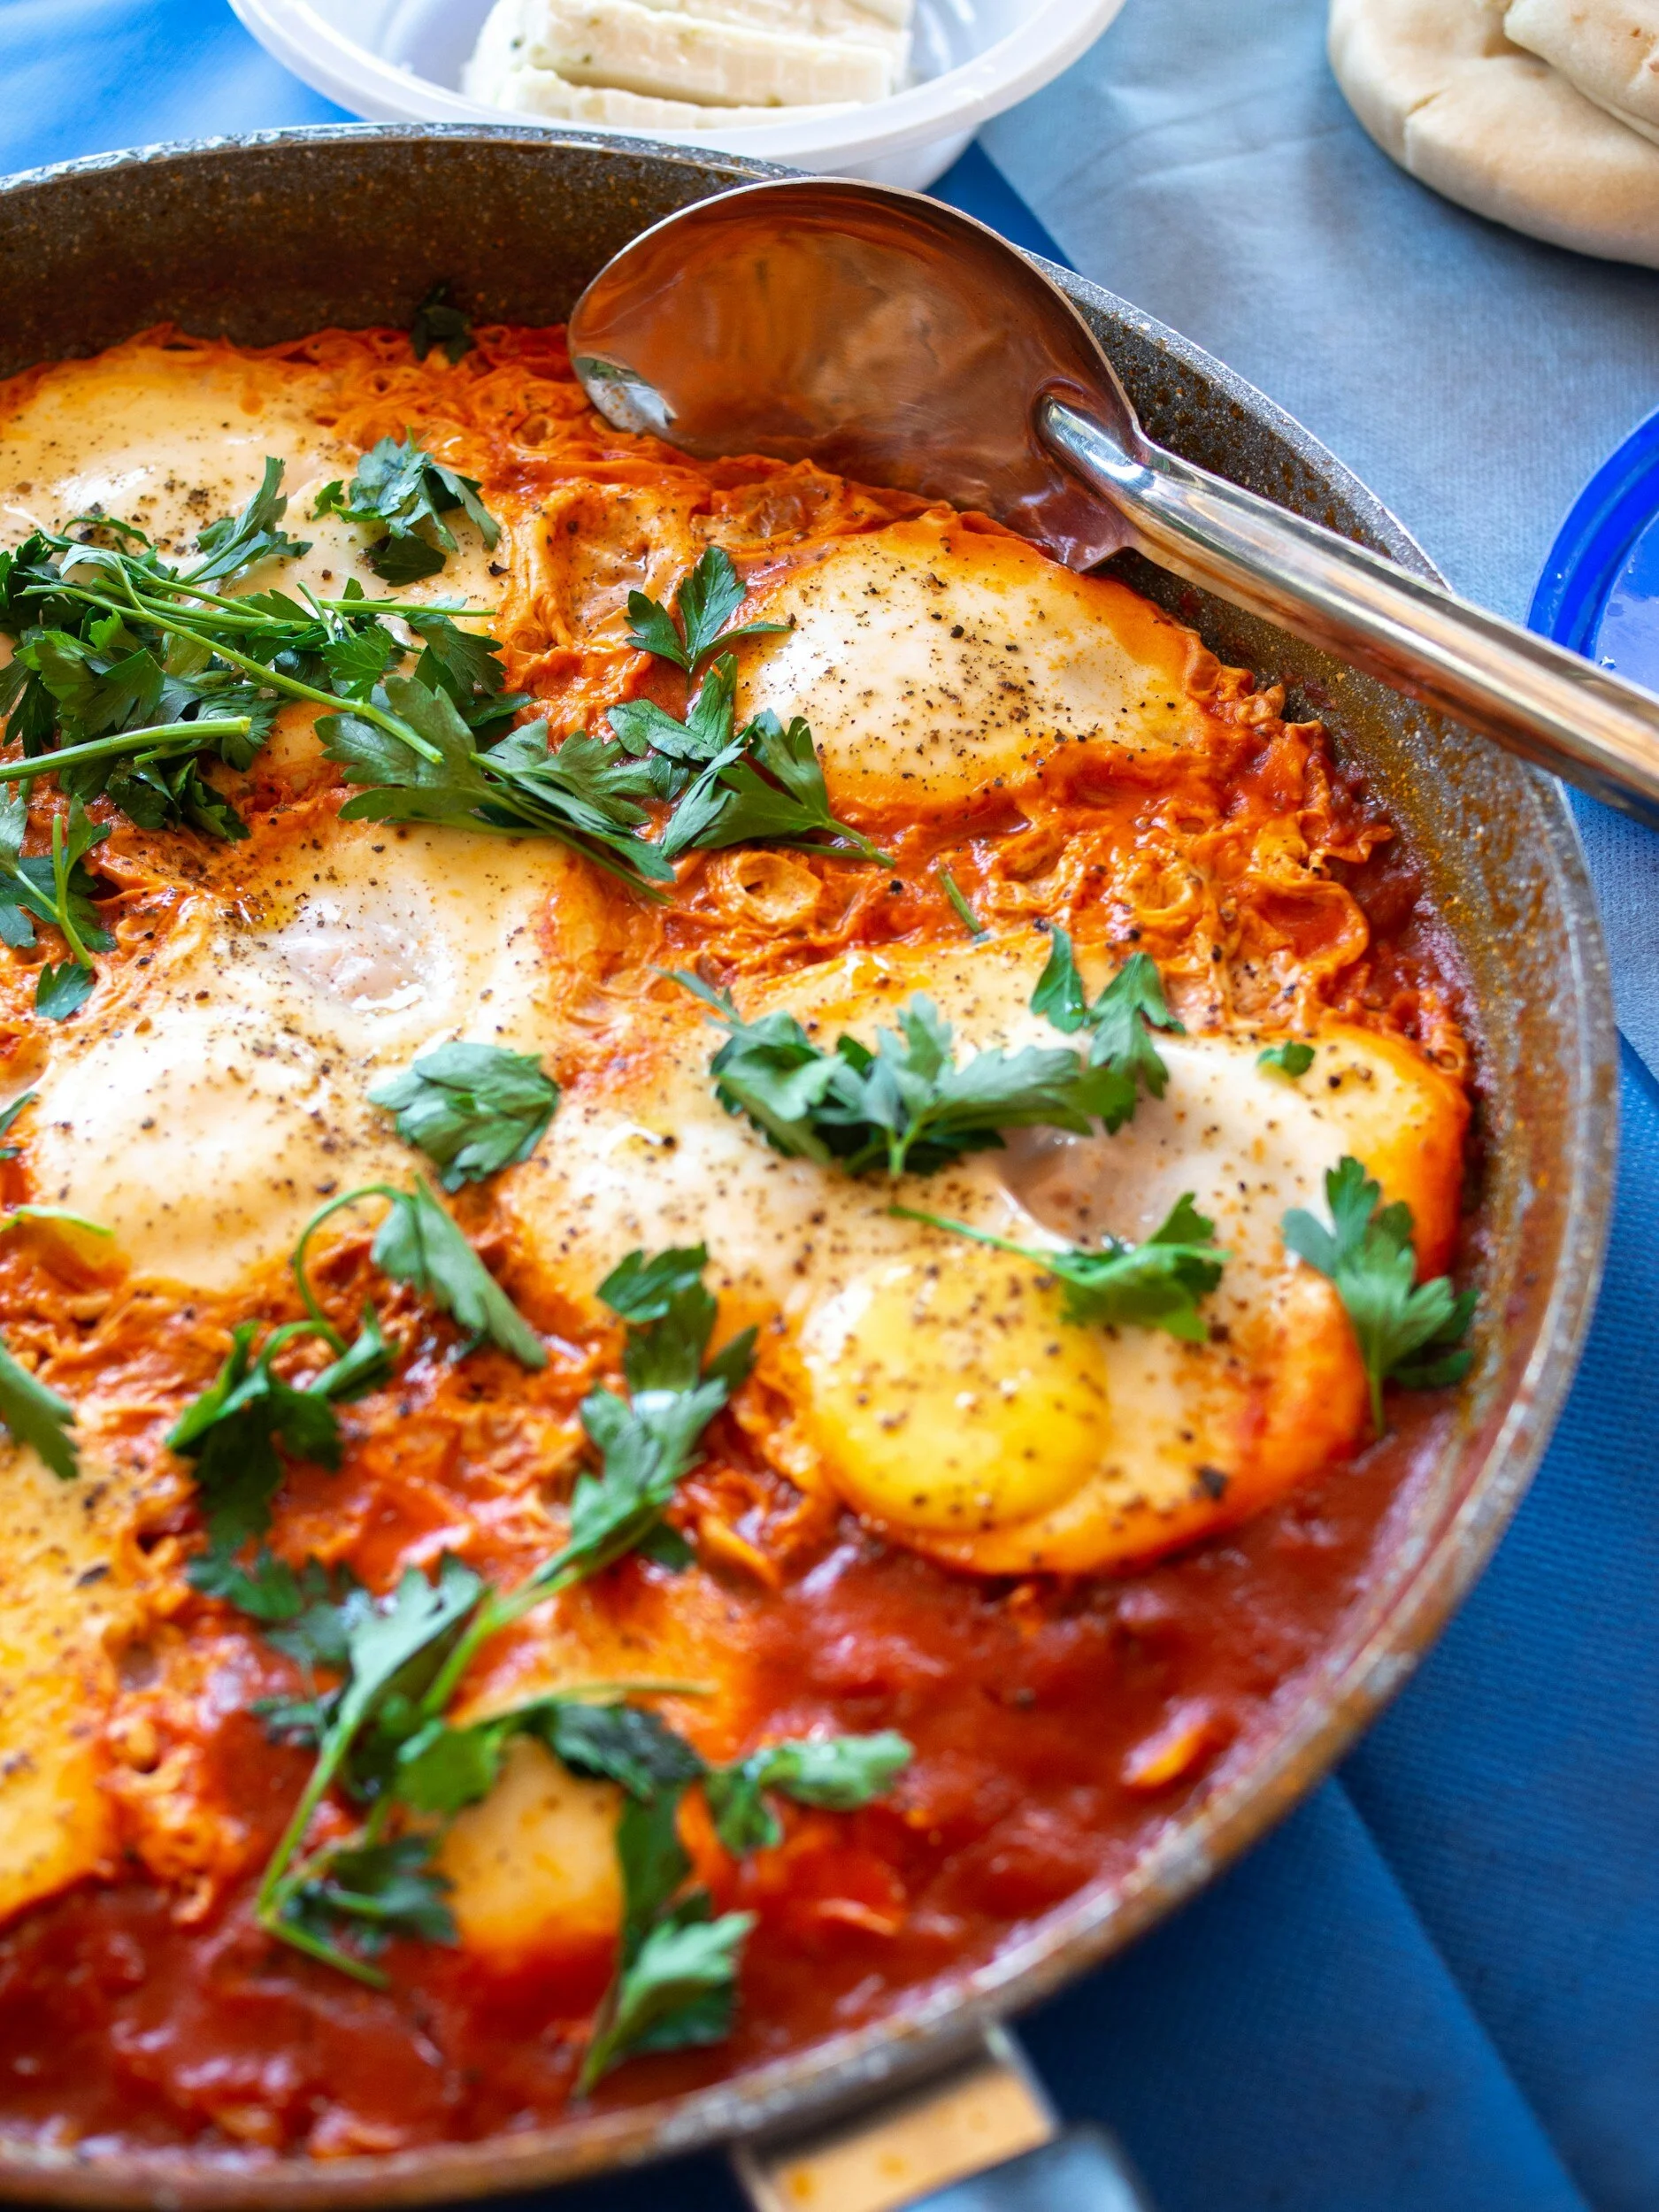
The Best, Easiest, Yummiest Shakshuka Recipe
This is a traditional shakshuka recipe — and it has been approved by both my Israeli wife and my Israeli-Iraqi father-in-law. So you know this is going to be good! And — it’s ready within 30 minutes.
This is a traditional shakshuka recipe — and it has been approved by both my Israeli wife and my Israeli-Iraqi father-in-law. So you know this is going to be good!

PREP: 10 ish minutes
COOK: 20 ish minutes
TOTAL: 30 ish minutes
SERVINGS: 4 to 6 servings
INGREGIENTS:
2 tablespoons olive oil
2 shallots, diced (sub for 1 medium onion)
1/2 bag of sweet mini bell peppers, dices (sub for 1 red bell pepper, diced)
4 garlic cloves, minced / chopped
2 teaspoon paprika
1 teaspoon cumin
¼ teaspoon chili powder (optional for spice)
1 28-ounce can petite diced tomatoes
4 to 6 large eggs
Salt and pepper, to taste
Cilantro or parsley for garnish, optional
INSTRUCTIONS:
Heat olive oil in a large sauté pan on medium heat. Add the chopped mini bell peppers and shallots and cook for 5 minutes or until the shallots becomes translucent.
Add garlic and spices and cook an additional minute.
Pour the can of tomatoes and juice into the pan and mix. Season with salt and pepper and bring the sauce to a simmer.
Use a large spoon to make small wells in the sauce and crack the eggs into each well. Cook the eggs for 5 to 8 minutes, or until the eggs are done to your liking. You can also cover the pan with a lid to expedite the eggs cooking.
Optional. Garnish with chopped cilantro and parsley before serving.

Gyu-Kaku Japanese BBQ Dining Nutritional Information
So I figured I’d put this post together because this information isn’t really out there and I feel like it should be. Gyu-Kaku is one of my favorite restaurants to go to. First off, Sydney loves to “do the cooking” which is nice on my end. Secondly, as someone who has been tracking her macros (macronutrients: Fats, Carbs, Proteins), I am usually always looking for ways to make sure I hit my protein goal, Gyu-Kaku, a Japanese BBQ restaurant is a great place when protein intake is needed. I also enjoy eating out but it’s common knowledge that eating out can be tricky while dieting. You could get a salad that you think is “healthy” but walk away having eaten an entire day’s worth of calories and then some! At Gyu-Kaku, I know if I pick a lean meat, I should be good.

So I figured I’d put this post together because this information isn’t really out there and I feel like it should be. If you’ve never been to a Gyu-Kaku BBQ restaurant, you should. Gyu-Kaku is one of my favorite restaurants to go to. First off, Sydney loves to “do the cooking” which is nice on my end. Secondly, as someone who has been tracking her macros (macronutrients: Fats, Carbs, Proteins), I am usually always looking for ways to make sure I hit my protein goal, Gyu-Kaku, a Japanese BBQ restaurant is a great place when protein intake is needed. I also enjoy eating out but it’s common knowledge that eating out can be tricky while dieting. You could get a salad that you think is “healthy” but walk away having eaten an entire day’s worth of calories and then some! At Gyu-Kaku, I know if I pick a lean meat, I should be good.

That being said, I still wanted to know the macros I was consuming and hated I had no clue except for their calorie count printed on their menu. So I reached out to their corporate office and asked for a nutritional breakdown…and they came through! Woohoo!
When I go to Gyu-Kaku my typical order is a house salad and 2 orders of Bistro Hanger Stake, maybe a side of rice if it looks like I have room in my macros for the day. When going into the restaurant all I knew was that the salad was 180 calories, the meat was 180 calories per portion and the rice would vary as I would weigh it out and enter into MyFitnessPal (because yes, I carry a pocket scale in my purse and I’m a bit cray..but that how I fit it into my macros for the day).
So is it healthy? Lets look

The salad breaks down as 15 grams of fat, 9 carbs, 2 protein. That comes to 179 Calories.
The Bistro Hanger Stake breaks down as 10 grams of fat, 0 grams of carbs, and 21 grams of protein. And remember I get 2 orders so lets double all these numbers to equal 20 grams of Fat and 42 grams of Protein.
In total, we are looking at 35 grams of fat, 9 grams of carbs and 44 grams of protein for a total of 527 calories and this is without my rice option.
To me, 527 calories are pretty low but those fats are really high. I usually have around 50 grams per day so this is more than half in one meal. I tend to swap my carbs and fats as needed and keep my proteins the same. So if I knew I was going to Gyu-Kaku I’d probably plan to swap my carbs for some extra fats that day.
Here is the nutritional breakdown for you to look at. Anything shock you in a good or bad way? And remember, each location might have a slightly different menu so you might see something on this menu not offered at your restaurant.


Sweet Corn Spoonbread
I was so fortunate to stumble across the recipe a few years ago when I thought I was making traditional cornbread. You can imagine to my surprise after all the baking when my finished product was more soupy and mushy than traditional dry cornbread. Needless to say, this is one of those mix-all-the-ingredients-together-and-bake sorta dishes, and your family and friends — and you — will never want the traditional kind again.
I was so fortunate to stumble across the recipe a few years ago when I thought I was making traditional cornbread. You can imagine to my surprise after all the baking when my finished product was more soupy and mushy than traditional dry cornbread. Needless to say, this is one of those mix-all-the-ingredients-together-and-bake sorta dishes, and your family and friends — and you — will never want the traditional kind again.

INGREDIENTS
1 (8.5-ounce) package JIFFY Corn Muffin Mix
1 (14.75-ounce) can cream style corn
1 (15-ounce) can whole kernel corn, drained
1/2 cup (1 stick) butter, melted
1 cup sour cream
3 eggs
1/2 teaspoon salt
Directions
Preheat the oven to 375° and lightly grease a 2-quart casserole dish with nonstick cooking spray. In a large bowl, combine the ingredients and mix well. Pour the mixture into the casserole dish. Bake 35 to 40 minutes, or until the spoon bread is golden brown and set.

The Ooiest, Gooiest Rice Krispie Treats
Most people would probably not bother adding a Rise Krispie Treats recipe to their blog since the original one is so readily available on every Rice Krispie box. But, once you try making them this way, you’ll never want them any other way again. So proceed with caution. These are dangerously delicious.
Most people would probably not bother adding a Rise Krispie Treats recipe to their blog since the original one is so readily available on every Rice Krispie box. But, once you try making them this way, you’ll never want them any other way again. So proceed with caution. These are dangerously delicious.

Photo by Rumbly in my Tumbly because we ate our entire batch and forgot to snap a photo!
INGREDIENTS
5 tablespoons butter
8 cups + another 2 cups of mini marshmallows
6 cups Rice Krispies cereal
1/2 teaspoon salt
Directions
Spray a 9×9 inch pan with non-stick spray and line it with a foil or parchment paper sling. Spray again.
In a very large microwave safe bowl, place your butter, salt, and 8 cups of mini marshmallows. Microwave in 30 second increments, stirring in between, until butter and marshmallows are completely melted and smooth.
Add in the Rice Krispie cereal and mix well. Add in the remaining marshmallows while still warm and lightly press into your prepared pan. (using a spoon with a little butter on it will help you accomplish this without it sticking all over your hands.)
Chill in the fridge for at least 30 minutes before cutting into squares. Enjoy!
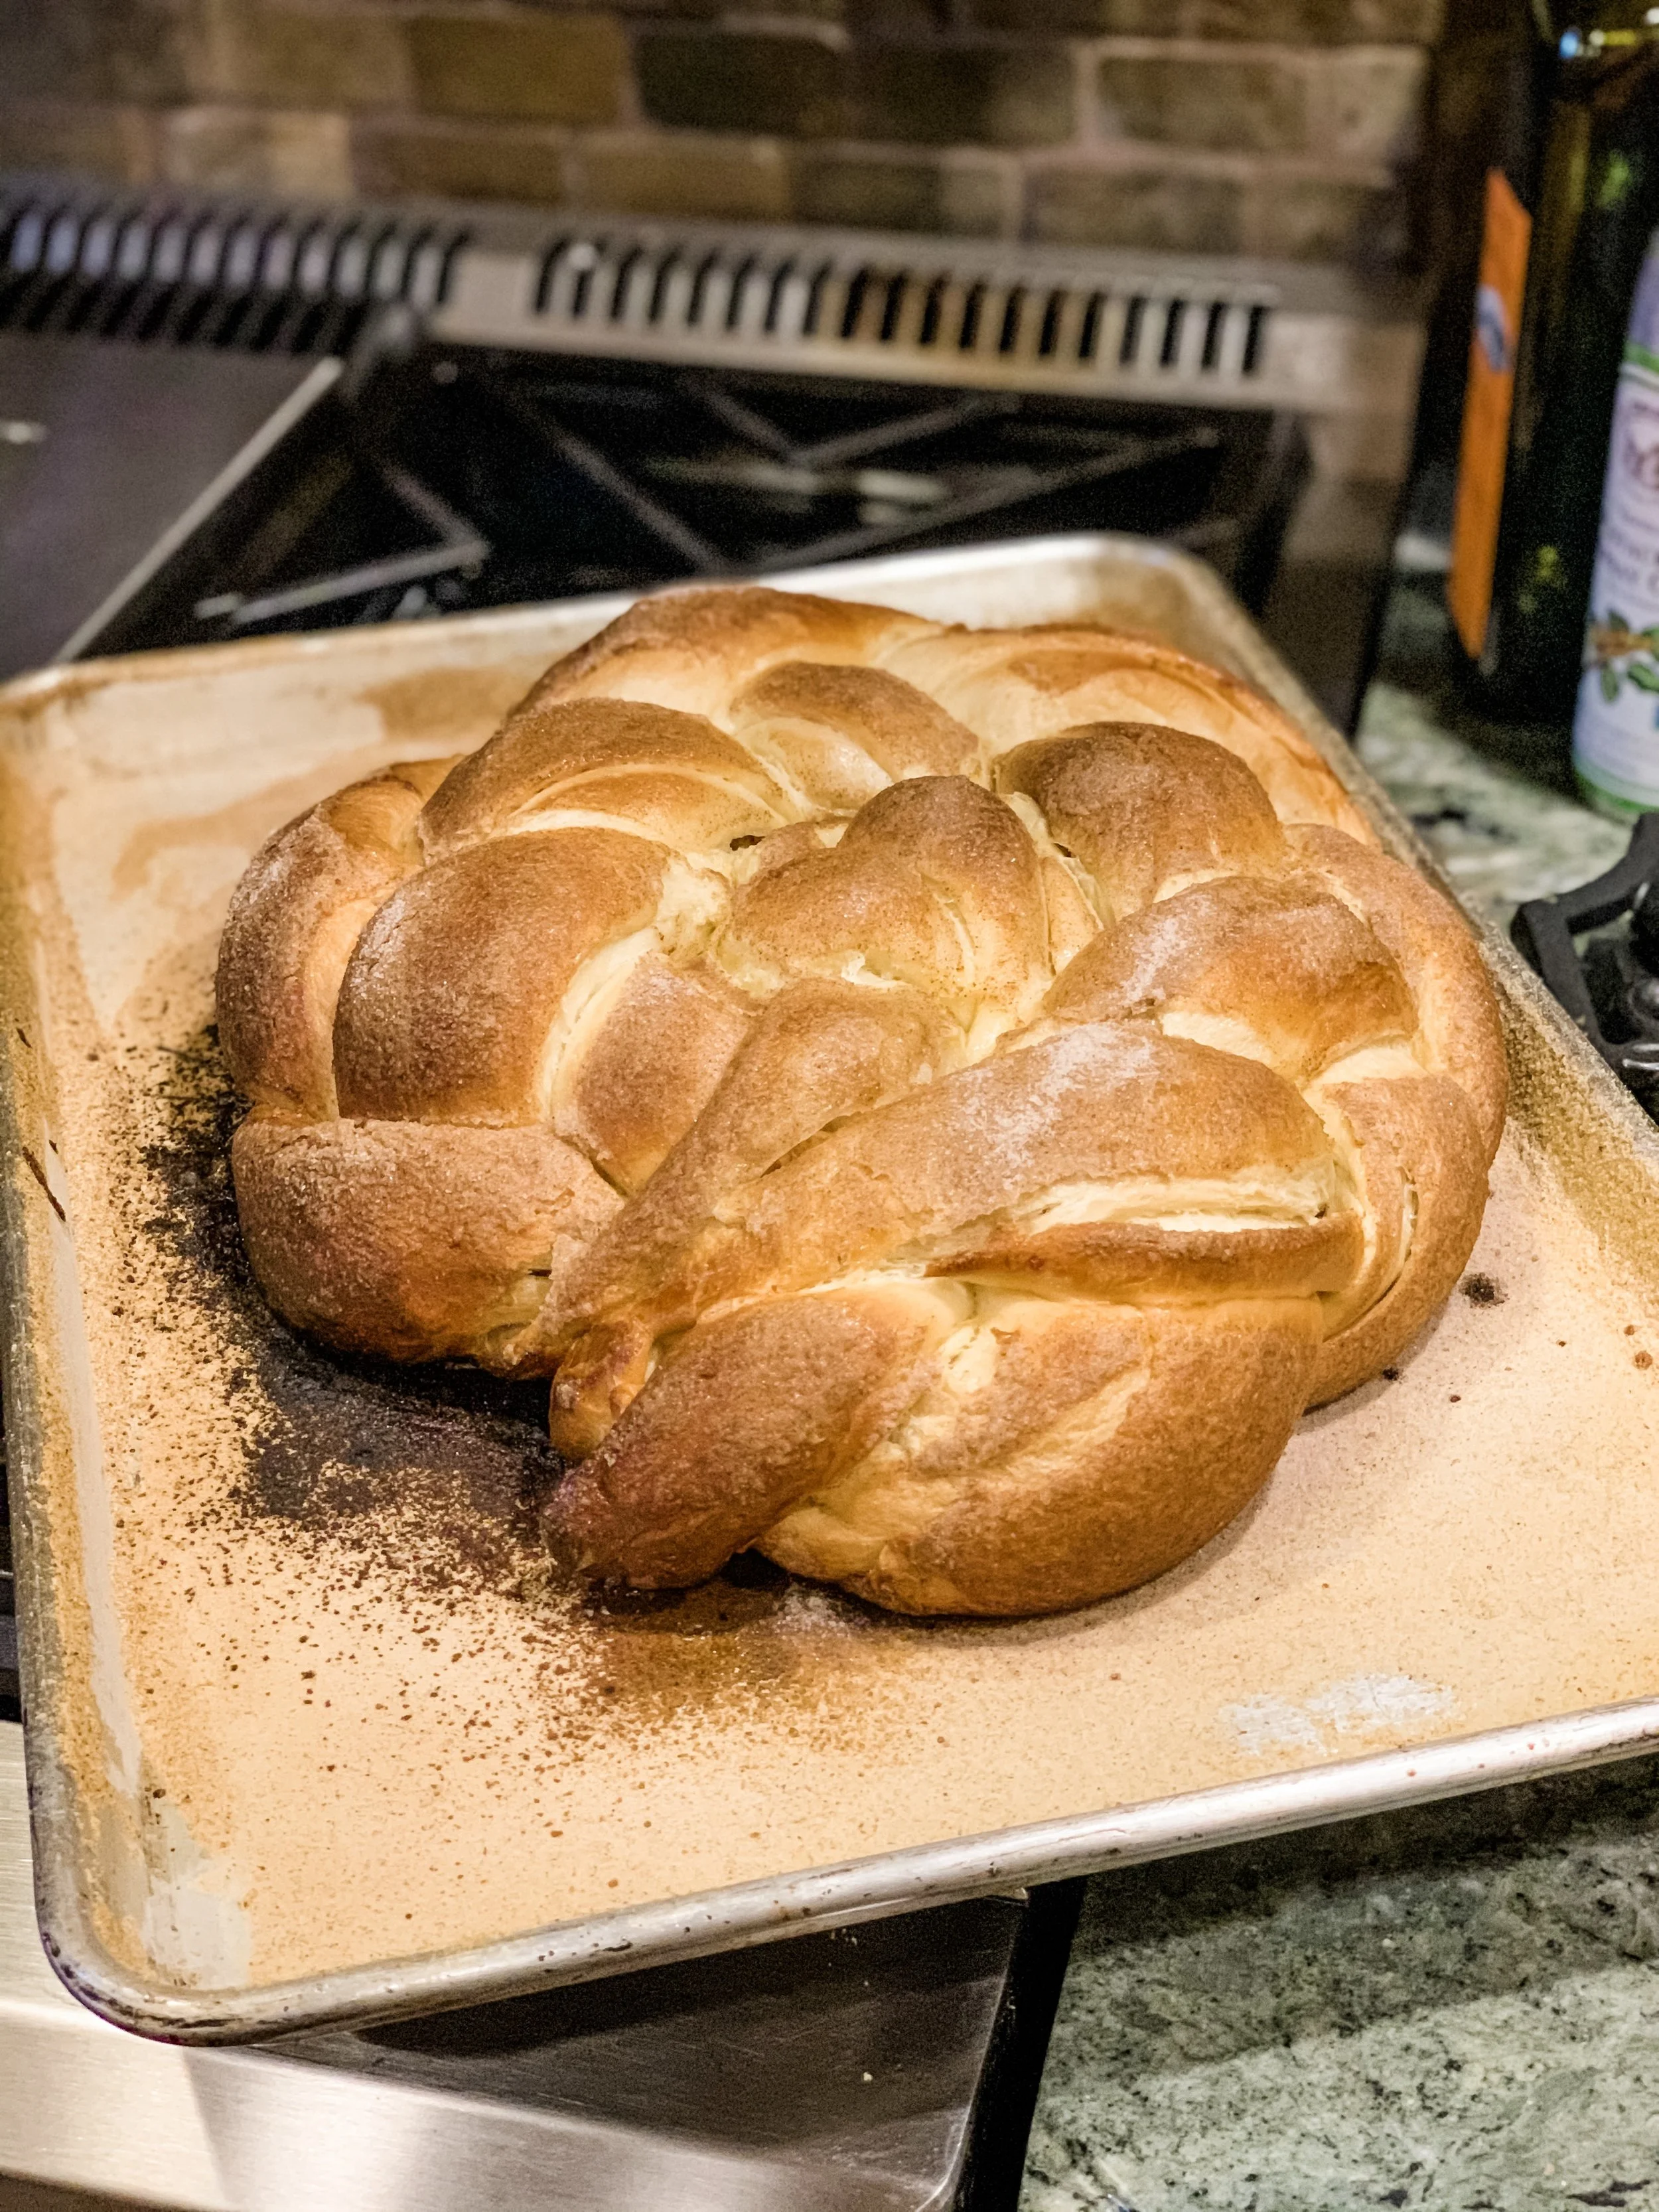
Cinnamon-Honey-Apple Stuffed Egg Challah
This challah has been a staple in our home for the Jewish High Holidays since I was a baby. Over the years I have stayed up late with mom baking this bread with her to ensure it’s timeliness for dinner. This year was a special treat as it was my first time making it on my own. May this sweet and wonderful recipe bring you and your family full, happy tummies!
This challah has been a staple in our home for the Jewish High Holidays since I was a baby. Over the years I have stayed up late with mom baking this bread with her to ensure it’s timeliness for dinner. This year was a special treat as it was my first time making it on my own. May this sweet and wonderful recipe bring you and your family full, happy tummies!

INGREDIENTS
1 package active dry yeast
1/2 cup sugar
1 teaspoon salt
1 cup warm water (100°F to 115°F)
4 to 5 cups flour
6 egg yolks
1/4 cup safflower or vegetable oil
4 tablespoons unsalted butter or margarine, melted
Apple Filling (recipe follows)
1 egg yolk beaten with 1 teaspoon water
Cinnamon Sugar
INGREDIENTS
4 large apples, peeled, cored, and diced
Juice of 1 large lemon
4 tablespoons honey
1/2 teaspoon cinnamon
Makes 1 Challah
In the bowl of an electric mixer, blend together the yeast, sugar, salt, warm water, and 2 cups of the flour, Blend in the egg yolks and oil. Add the remaining flour, 1 cup at a time, blending after each addition, until the dough is thick enough to word by hand. Gather the dough into a ball. Place it on a floured board and knead 5 to 10 minutes, adding additional flour, until the dough is smooth and elastic. Shape the dough into a ball and place it in an oiled bowl, and oil the top. Cover with a towel and let rise in a warm place until doubled in size, about 1 and 1/2 hours.
Punch down the dough and divide into 3 parts. Roll each part into a rectangle. Brush with melted butter and top with the apple filling. Roll each rectangle into a long rope. Seal the ends of the rope together and braid. Place it on an oiled baking sheet. Cover with a towel and let rise in a warm place for 45 minutes, or until doubled in size.
Preheat the oven to 350°F. Brush with egg yolk wash, then sprinkle with cinnamon sugar. Bake for 30 to 40 minutes, or until golden brown. Cool on a rack.
Apple Filling
In a bowl, combine the apples, lemon juice, honey, and cinnamon. Cover with plastic wrap and chill. Drain thoroughly and use for the challah filling.